DIY Handmade Christmas Tree Decorations: A Step-by-Step Guide To Making A Cardboard Christmas Tree
Team ParentCircle
Outshine shop-bought Christmas decorations with your own handmade DIY Christmas tree. Here are some homemade Christmas craft and decoration ideas to deck your halls with boughs of 'paper' holly

Who doesn't love the Christmas season? It's the time of the year when homes are filled with stars and there are delicious treats to spread warmth and joy. Have you thought about bedecking your house with some nice handmade Christmas decorations?
Making a handmade DIY Christmas tree can be pretty exciting for the family. Let's help you sort that out right now! Also, read about some beautiful homemade Christmas craft ideas to deck your halls up for the season.
How to make a handmade Christmas tree?
Make this life-sized Christmas tree using cardboard; add our handmade decorations and celebrate an eco-friendly Christmas.
Materials required
- 2 3-foot pieces of cardboard
- a big cardboard shoebox
- a pair of scissors or a paper cutter (adult supervision necessary)
- packing tape
- green paint
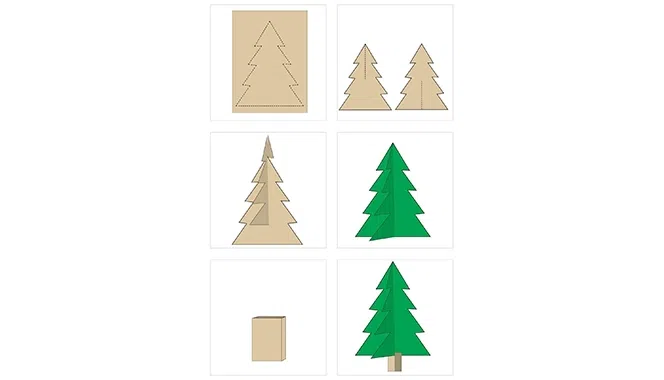
Method
1. Draw the outline of a Christmas tree on both pieces of cardboard.
2. Cut out the tree shape along the lines.
3. In the first piece of cardboard, make a slit (about 5mm in width) from the top to the middle of the tree.
4. In the second cardboard, make a similar slit, but from the bottom to the middle.
5. Place the second cardboard over the slit you made on the first cardboard's top. Paint your tree green.
6. Secure all sides of the shoebox with tape. Place it vertically. Remove the top.
7. Make a slit (2 inches in length) on all four corners.
8. Fit the tree into the shoebox such that the four sides of the tree sit on the four corners of the shoebox. Your homemade tree is ready.
Popsicle stick reindeer ornament
Celebrate Santa's colorful, adorable helpers with this craft activity. With a few popsicle sticks, a couple of googly eyes, and a pompom, bring Rudolph, the red-nosed reindeer alive!
Materials required
- 3 popsicle sticks
- 2 googly eyes
- a red pompom
- glue
- satin ribbon
- brown paint
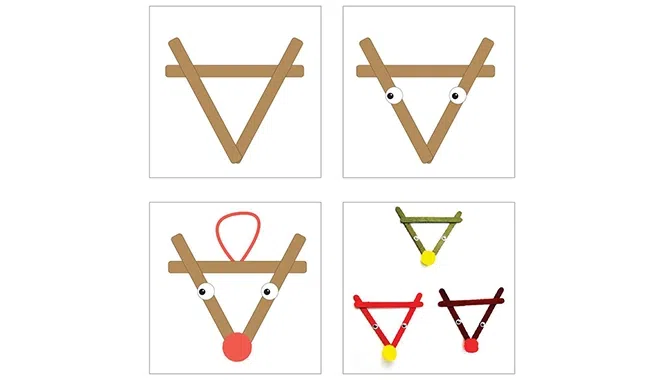
Method
1. Color the popsicle sticks with brown paint.
2. Arrange the sticks in a triangle as shown in the picture and glue them together.
3. Stick the googly eyes on either side.
4. Glue the red pompom where the two sides meet.
5. Make a loop in the satin ribbon and glue it to the reindeer. There, now Rudolph can adorn your Christmas tree!
How to make paper holly leaves?
These spiny leaves with red berries are quintessential Christmas decorations. We are giving you a printable version so you and your child can easily make these at home.
Materials required
- green and red-colored sheets of paper
- a pair of scissors
- template of holly leaves
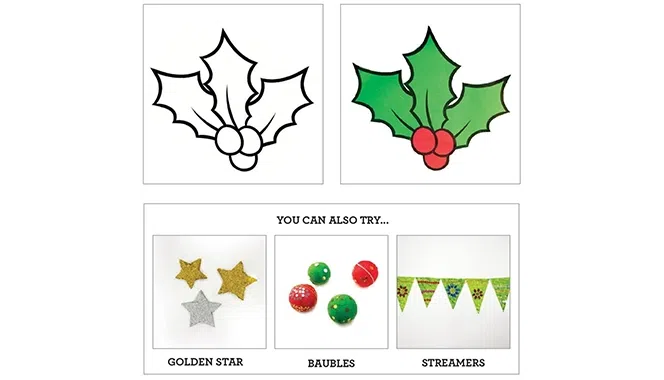
Method
1. Take a printout of the leaves template on the green paper.
2. Cut the shapes along the outline so you get leaves.
3. Cut the red paper into a circular shape corresponding to the size of the berries in the template.
4. Glue the red circles on the leaves. Now, you have your own holly leaves minus the spikes.
Now that we have provided enough inspiration for you to turn your house into a winter wonderland, what are you waiting for? Go ahead, get decorating your home, as a family! Remember, kids love Christmas and all things shiny and shimmery, so they are bound to have a great time.
Have a very Merry Christmas!


")


")

")


Comments
Edit
Comment Flag
Cancel Update